There’s something deeply satisfying about growing your own herbs, isn’t there? The scent of fresh chives wafting through your kitchen, the vibrant green shoots peeking out of rich, dark soil—it’s a small but mighty victory for any gardener. If you’re looking to nurture chive seeds in rich soil, you’ve come to the right place. I’ve spent years tinkering with herb gardens, learning through trial and error (and plenty of muddy hands), and I’m excited to share what I’ve discovered. This isn’t just about tossing seeds into the ground; it’s about creating the perfect environment for chives to thrive, from soil prep to harvest. Let’s dig in—pun intended—and explore how to give your chive seeds the best start possible.
Why Rich Soil Matters for Chive Seeds
Chives, with their delicate, onion-like flavor, are hardy little plants, but they’re not immune to the pitfalls of poor soil. Think of soil as the foundation of a house—if it’s weak, everything else crumbles. Rich soil, packed with organic matter and nutrients, gives chive seeds the nutrients they need to germinate and grow into robust plants. I’ve seen firsthand how chives in nutrient-dense soil produce thicker, more flavorful leaves compared to those struggling in compacted or sandy dirt. According to the University of Minnesota Extension, soil rich in organic matter retains moisture and provides essential elements like nitrogen and phosphorus—key for healthy herb growth. So, before you even think about planting, ask yourself: Is my soil up to the task?
Preparing the Perfect Soil Mix to Nurture Chive Seeds
Let’s get down to brass tacks. Creating rich soil isn’t rocket science, but it does require a bit of elbow grease. Start with a good base—loamy soil is ideal because it balances drainage and moisture retention. If your garden soil is more clay or sand than loam, don’t despair. I’ve dealt with both in my backyard over the years, and the fix is simple: amend, amend, amend. Mix in well-rotted compost or aged manure to boost organic content. I usually aim for a ratio of about one part compost to two parts native soil. This not only enriches the earth but also improves its structure, making it easier for tiny chive roots to spread.
Another tip? Test your soil’s pH. Chives prefer a slightly acidic to neutral range, around 6.0 to 7.0. You can grab a cheap testing kit at any garden center. If the pH is off, a little lime can raise it, or sulfur can lower it—just go slow and retest after a few weeks. Last spring, I neglected this step and wondered why my chives were stunted. A quick test revealed my soil was too acidic at 5.5. A small adjustment made all the difference by the next planting cycle. Rich soil isn’t just about nutrients; it’s about balance.
Planting Chive Seeds with Care
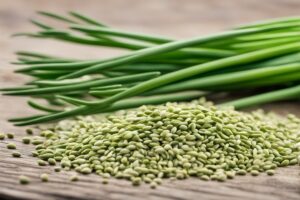
Once your soil is prepped, it’s time to plant. Chive seeds are tiny, so handle them with a gentle touch. Sow them about a quarter-inch deep, spacing them a few inches apart to avoid overcrowding. I’ve made the mistake of planting too densely before, thinking I’d get a lush patch overnight. Spoiler: It led to weak, spindly plants fighting for space. Give them room to breathe. Cover the seeds lightly with soil and water gently—think soft rain, not a fire hose. The goal is to keep the soil moist, not waterlogged, as you nurture chive seeds in rich soil.
Timing matters too. Chives can be started indoors 6-8 weeks before the last frost or sown directly outside in early spring. I prefer starting indoors because it gives me a head start, especially in my chilly zone 5 climate. Place your seed trays near a sunny window or under grow lights, and within 7-14 days, you should see those first green specks. It’s like watching a tiny miracle unfold every time.
Maintaining Soil Quality for Long-Term Growth
Planting is just the beginning. To keep your chives thriving, you’ve got to maintain that rich soil over time. Mulching is a game-changer here. A thin layer of organic mulch, like straw or shredded bark, helps retain moisture and keeps weeds at bay. I learned this the hard way after a hot summer left my chive patch parched and overrun with dandelions. Mulch would’ve saved me hours of weeding. Plus, as it breaks down, it adds even more organic matter to the soil—a win-win.
Don’t skimp on watering either. Chives like consistent moisture, especially in their early stages. Aim for about an inch of water per week, adjusting based on rainfall. And here’s a pro tip: fertilize lightly with a balanced, organic fertilizer (like a 10-10-10 mix) once a month during the growing season. Overdoing it can lead to lush leaves with no flavor, so moderation is key. I’ve found that a little compost tea works wonders too—it’s like a vitamin boost for the soil.
Troubleshooting Common Soil Issues for Chives
Even with the best intentions, things can go sideways. Imagine you’ve done everything right, but your chives look yellow and sad. What gives? Poor drainage might be the culprit. If your soil holds water like a sponge, roots can rot. I’ve battled this in a low-lying corner of my garden where water pooled after every rain. The solution? Raised beds. They elevate the soil, improve drainage, and give you control over the mix. If raised beds aren’t an option, mix in some coarse sand or perlite to loosen things up.
Then there’s nutrient deficiency. If growth stalls, your soil might be lacking something vital. A soil test can pinpoint the issue, but I’ve often just added a handful of compost and watched the plants perk up. And pests? While chives are pretty tough, slugs can munch on tender shoots. Keep the soil surface clean of debris to deter them. These hiccups are part of the journey—gardening is as much about problem-solving as it is about planting.
Harvesting and Sustaining Your Chive Patch
After all the effort to nurture chive seeds in rich soil, the reward is a bountiful harvest. Chives are ready to cut when they’re about 6 inches tall. Snip the leaves about an inch above the soil with sharp scissors, and they’ll regrow for multiple harvests. I love tossing fresh chives into omelets or sprinkling them over baked potatoes—there’s nothing quite like that homegrown flavor. But here’s the catch: don’t overharvest. Taking more than a third of the plant at a time can stress it out. I learned this after getting a bit snip-happy one summer, only to watch my chives struggle to bounce back.
To keep your patch going year after year, divide the clumps every few seasons. This prevents overcrowding and rejuvenates the soil’s nutrients as you replant. It’s like giving your chives a fresh lease on life. And if you’re in a colder climate like mine, mulch heavily in winter to protect the roots. I’ve lost a few patches to harsh freezes before I started doing this, so trust me—it’s worth the extra step.
References
- University of Minnesota Extension – Growing Chives
- Penn State Extension – Growing Herbs Outdoors
- Missouri Botanical Garden – Allium schoenoprasum (Chives)
- University of Illinois Extension – Chives
- Royal Horticultural Society – Growing Chives
Disclaimer: This article is for informational purposes only, based on general research and personal experience. It is not intended to serve as a substitute for professional advice. Gardening conditions, soil types, and plant needs can vary widely based on location, climate, and individual circumstances. Always consult a qualified horticulturist, agricultural extension service, or other professional for personalized guidance tailored to your specific situation. While I’ve shared tips and insights from my own gardening journey, they may not apply universally, and results can differ. Your diligence in seeking expert input will ensure the best outcomes for your chive-growing endeavors.
This content is for informational purposes only and not a substitute for professional advice.