If you’ve ever dreamed of a garden bursting with vibrant, elegant blooms, Dutch Iris might just be your ticket to paradise. These stunning perennials, with their striking colors and graceful form, can transform any outdoor space into a masterpiece. But let’s be real—getting them to thrive isn’t always a walk in the park. That’s where I come in. With years of trial and error in my own backyard, plus insights gleaned from horticultural experts, I’m excited to share my best planting tips for Dutch Iris. Whether you’re a seasoned gardener or a newbie with a trowel, this guide will help you plant, nurture, and enjoy these beauties like a pro. So, grab a cup of coffee, and let’s dig into the dirt—literally!
Why Dutch Iris Deserves a Spot in Your Garden
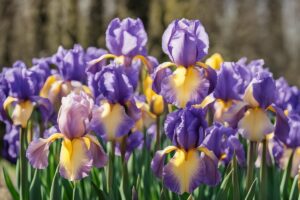
Before we get into the nitty-gritty of planting tips for Dutch Iris, let’s talk about why these flowers are worth the effort. Known for their tall, slender stems and vivid petals—often in shades of blue, purple, yellow, or white—Dutch Iris (Iris hollandica) are a hybrid variety bred for their resilience and beauty. They bloom in late spring to early summer, offering a pop of color when many other flowers are just getting started. Plus, they’re relatively low-maintenance once established, which is a win for anyone juggling a busy schedule. I remember the first time I planted Dutch Iris in my garden; I was skeptical about their hardiness, but by the next season, they were stealing the show. Trust me, once you see them in full bloom, you’ll be hooked.
Choosing the Perfect Spot: Location Is Everything
One of the most critical planting tips for Dutch Iris is picking the right spot. These bulbs crave sunlight—think at least six hours of direct rays daily. If you’ve got a shady yard, don’t despair; just scout for the sunniest patch you can find. They also prefer well-drained soil. Imagine you’re dealing with heavy clay soil that holds water like a sponge—your bulbs might rot before they even have a chance to sprout. Been there, done that! A few years back, I planted a batch in a low-lying area of my garden, only to watch them drown after a heavy rain. Lesson learned: if drainage is an issue, consider raised beds or mix in some sand or compost to loosen things up.
Another thing to keep in mind is spacing. Dutch Iris bulbs need room to breathe—plant them about 4 to 6 inches apart to avoid overcrowding. This not only helps with air circulation but also gives each plant a fair shot at nutrients. If you’re unsure about your soil’s quality, a quick test (available at most garden centers) can reveal pH levels and nutrient content. Aim for a slightly acidic to neutral range, around 6.0 to 7.0. Not sure how to test? Check out our guide on soil testing for gardens for a step-by-step breakdown.
Timing Is Key: When to Plant Dutch Iris Bulbs
Ever heard the saying, “Timing is everything”? Well, it couldn’t be truer when it comes to planting Dutch Iris. The ideal time is in the fall, typically between September and early November, depending on your climate. This gives the bulbs a chance to establish roots before winter sets in, ensuring a strong start come spring. If you’re in a warmer zone (like USDA Zones 8-10), you might even chill the bulbs in the fridge for 6-8 weeks before planting to mimic a cold period—nature’s little wake-up call. I’ve done this myself living in a milder area, and it worked like a charm. On the flip side, if you miss the fall window, don’t sweat it. Early spring planting can work, though blooms might be delayed or less robust the first year.
One pro tip: keep an eye on your local frost dates. Planting too late in fall might leave bulbs vulnerable to freezing before they root. The University of Extension services often publish frost date charts for free—definitely worth a peek if you’re new to gardening in your area.
How Deep Should You Go? Planting Depth and Technique
Now, let’s tackle one of the most common questions I get: how deep do you plant Dutch Iris bulbs? The sweet spot is about 4 to 5 inches deep, with the pointed end facing up. This depth protects them from temperature swings while allowing easy access to the surface when it’s time to sprout. I like to use a bulb planter for precision—it’s a small investment that saves a ton of guesswork. If you’re planting in groups (which I recommend for a fuller look), dig a wider hole and place several bulbs together, spacing them as mentioned earlier.
Here’s a little anecdote: the first time I planted Dutch Iris, I buried them too shallow, thinking they’d pop up faster. Big mistake. Half of them got unearthed by curious squirrels, and the rest struggled to anchor properly. After some research and a chat with a local nursery owner, I corrected my approach, and the next batch thrived. So, take it from me—don’t skimp on depth. And if critters are a problem in your area, a layer of mulch or chicken wire over the soil can act as a deterrent. Curious about other bulb-planting hacks? Our post on essential bulb planting tools has you covered.
Watering and Care: Don’t Overdo It
Once your Dutch Iris bulbs are in the ground, the next of my planting tips for Dutch Iris focuses on care—starting with watering. These plants don’t like to sit in soggy soil, so water sparingly after planting, just enough to settle the earth. If fall rains are frequent in your area, you might not need to water at all until spring. Come growing season, aim for about an inch of water per week, either from rainfall or manual watering, especially during dry spells. I’ve found that a soaker hose works wonders for even distribution without over-saturating.
Another thing to watch is fertilization. A balanced, slow-release fertilizer (like a 10-10-10 mix) applied in early spring can give your Iris a boost. But here’s the catch—don’t overfeed. Too much nitrogen can lead to lush foliage at the expense of flowers, and nobody wants that. If you’re into organic options, compost or well-rotted manure works just as well. For more on feeding your flowers, see our detailed article on fertilizing perennials.
Dealing with Challenges: Pests, Diseases, and Other Headaches
Let’s face it—no garden is immune to problems, and Dutch Iris is no exception. One common issue is iris borer, a pesky larva that tunnels into bulbs and stems, causing rot. If you notice wilting or mushy spots, dig up the affected bulb and dispose of it far from your garden. I’ve dealt with this firsthand, and while it’s heartbreaking to lose a plant, quick action saved the rest of my patch. Prevention-wise, clean up garden debris in fall to reduce hiding spots for pests.
Fungal diseases like leaf spot can also crop up, especially in humid climates. Good spacing and avoiding overhead watering can minimize risks. If you spot trouble, a fungicide might help, but always follow label instructions. And here’s a rhetorical question for you: why risk losing your gorgeous blooms to preventable issues? Stay proactive with regular inspections, and you’ll keep your Dutch Iris happy and healthy.
Long-Term Success: Dividing and Replanting
Here’s a bonus among my planting tips for Dutch Iris—don’t forget about long-term care. After a few years, your Iris clumps might get crowded, leading to fewer blooms. The fix? Divide them every 3-4 years in late summer or early fall. Simply dig up the clump, separate the healthy bulbs, and replant them in fresh soil. I did this last year with a particularly dense patch, and the rejuvenated plants rewarded me with a spectacular display this spring. It’s like giving your garden a fresh start, and honestly, it’s pretty satisfying to see the results of a little hard work.
References
- University of Minnesota Extension – Growing Irises
- Royal Horticultural Society – Iris Growing Guide
- Old Farmer’s Almanac – Planting and Growing Iris
Disclaimer: This article is for informational purposes only, based on general research and personal experience—it’s not a substitute for professional advice. Gardening conditions vary widely by region, soil type, and individual circumstances, so results may differ. Always consult a qualified horticulturist, local extension service, or gardening professional for personalized guidance tailored to your specific needs and environment. Your garden’s success depends on informed decisions, and I encourage you to seek expert input when necessary.
This content is for informational purposes only and not a substitute for professional advice.