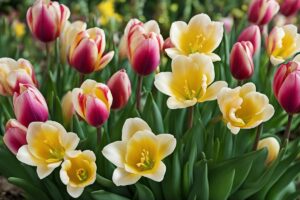
Have you ever gazed at a vibrant bed of freesias, their delicate petals swaying in the breeze, and wondered how you could multiply that beauty in your own garden? If so, you’re in for a treat. Propagating freesia bulbs is not only doable but also incredibly rewarding when you know the right steps. Today, I’m diving deep into how to propagate freesia bulbs easily, sharing practical tips, personal insights, and expert-backed methods to help you grow these fragrant blooms like a pro. Whether you’re a seasoned gardener or a curious newbie, let’s roll up our sleeves and get started on this blooming journey!
Why Propagate Freesia Bulbs at Home?
Before we dig into the “how,” let’s talk about the “why.” Freesias, with their trumpet-shaped flowers and sweet fragrance, are a gardener’s delight. But buying new bulbs every season can put a dent in your wallet. Propagating your own freesias at home saves money, sure, but it’s also a chance to connect with nature on a deeper level. Imagine nurturing a tiny bulb into a flourishing plant—there’s a quiet pride in that. Plus, propagation lets you share your bounty with friends or expand your garden without breaking the bank. So, why not give it a shot?
Beyond personal satisfaction, propagating freesias helps preserve unique varieties. Some heirloom or rare freesias might not be available at your local nursery, but with a little know-how, you can keep those treasures alive year after year. Trust me, I’ve lost count of how many times I’ve gifted a batch of homegrown freesia bulbs to a neighbor, only to see their face light up. It’s a win-win!
Understanding Freesia Bulb Basics Before You Start
Let’s get one thing straight: freesias aren’t true bulbs. Technically, they’re corms—fleshy, underground storage organs similar to bulbs but with a few quirks. Knowing this matters because it affects how they grow and multiply. Each year, a freesia corm produces new cormlets (baby corms) around its base, and these little guys are your ticket to propagation. But here’s the catch—they don’t all sprout right away. Patience is key, and I’ll admit, I’ve had moments of doubt staring at dormant cormlets, wondering if I’d done something wrong. Spoiler: I hadn’t. They just needed time.
Freesias thrive in well-drained soil and prefer cooler climates for optimal growth, though they can adapt to warmer zones with some TLC. If you’re in a region with harsh winters, you’ll need to dig up and store the corms before frost hits—more on that later. For now, just know that understanding your local conditions is half the battle when you’re aiming to propagate freesia bulbs easily.
Step-by-Step Guide to Propagate Freesia Bulbs Easily
Alright, let’s get down to business. Propagating freesia bulbs is simpler than you might think, and I’m breaking it down into clear, actionable steps. I’ve done this dozens of times in my own backyard, tweaking my approach with each season, so you’re getting the real deal here.
- Harvest the Cormlets: After your freesias finish blooming (usually late spring to early summer), wait for the foliage to yellow and die back naturally. Dig up the corms gently with a garden fork. You’ll notice small cormlets clinging to the parent corm. Separate them carefully—think of it like untangling a delicate necklace. These are your future plants!
- Store Properly: Clean off any soil and let the cormlets dry in a cool, shaded spot for a day or two. Then, store them in a breathable bag (like a paper or mesh bag) in a dry, cool place until planting time. I’ve made the mistake of storing them in plastic once, and let’s just say mold became an uninvited guest. Don’t do that.
- Plant at the Right Time: In mild climates, plant cormlets in fall for spring blooms. If you’re in a colder area, wait until early spring after the last frost. Plant them about 2 inches deep in well-draining soil, pointy end up. Space them 3-4 inches apart to give them room to grow. I like to add a bit of compost to the soil for a nutrient boost—freesias aren’t picky, but they appreciate the extra love.
- Water and Wait: Keep the soil lightly moist but not soggy. Overwatering is a rookie mistake I’ve made, and it led to rot. Once shoots appear (usually in 2-3 months), you’re on your way. Be patient—some cormlets take a year or two to bloom, but when they do, it’s worth the wait.
One last tip: label your planting spots. I didn’t once, and come spring, I was scratching my head trying to remember where I’d tucked those cormlets. Learn from my forgetfulness!
Alternative Propagation Methods: Seeds and Division
While cormlets are the easiest way to propagate freesia bulbs, they’re not the only option. Let’s explore two other methods, though I’ll warn you—they’re not always as straightforward.
First, there’s growing freesias from seeds. It’s possible, but it’s a slow road. Seeds can take years to produce blooming plants, and the offspring might not look like the parent due to cross-pollination. I tried this once out of curiosity, sowing seeds in a tray with a light potting mix. After months of waiting, only half germinated, and the flowers were a surprise mix of colors. It was fun, but if you’re after quick results, stick to cormlets.
Then there’s division, which is essentially what we do with cormlets but on a larger scale. If a corm has grown large enough, you can cut it into pieces, ensuring each piece has a growth point. This method is riskier due to potential rot or infection, so sterilize your tools and dust the cuts with fungicide. I’ve had mixed success with this, but when it works, it’s a fast way to multiply your stock.
Common Pitfalls to Avoid When Propagating Freesia Bulbs
Let’s be real—propagation isn’t always smooth sailing. I’ve hit plenty of bumps along the way, and I’m sharing them so you don’t have to learn the hard way. First up, don’t plant cormlets too deep. I did this early on, thinking deeper meant safer, but they struggled to push through the soil. Two inches is plenty. Also, watch out for pests like aphids or rodents who think your corms are a snack. A bit of netting or organic pest control can save you a headache.
Another trap is neglecting storage conditions. If cormlets get too damp or hot while stored, they’ll rot or sprout prematurely. I lost a batch to humidity one summer because I didn’t check on them—lesson learned. Finally, don’t expect instant blooms. Some cormlets need a couple of seasons to mature. If you’re itching for flowers ASAP, mix in some mature bulbs with your newbies for a fuller display while you wait.
Tips for Long-Term Success with Freesia Propagation
Propagating freesia bulbs easily is just the start—keeping them thriving is the real goal. Once your cormlets are in the ground, give them a sunny spot with at least 6 hours of light daily. If you’re in a hot climate, a bit of afternoon shade helps prevent scorching. Water sparingly during dormancy; I’ve found a light sprinkle every couple of weeks is enough unless it’s bone-dry.
Every few years, dig up and divide your freesias to prevent overcrowding. I do this in my garden every third season, and it keeps the blooms vigorous. Also, consider rotating planting spots to avoid soil depletion or disease buildup. And here’s a personal favorite trick: mulch lightly with straw or bark to retain moisture and keep weeds at bay. It’s a small step, but it’s saved me hours of weeding.
Lastly, don’t be afraid to experiment. Gardening is as much art as science. Maybe try companion planting with low-growing annuals to shade the soil, or test different fertilizers to see what your freesias love best. Over the years, I’ve found that a little trial and error builds confidence and turns challenges into victories.
References
- University of Minnesota Extension – Growing Freesias
- Missouri Botanical Garden – Freesia Plant Profile
- Clemson University Cooperative Extension – Bulbs and Corm Propagation
- Royal Horticultural Society – Freesia Growing Guide
- Colorado State University Extension – Bulbs, Corms, and Tubers
Disclaimer: This article is for informational purposes only, based on general research and personal experience. It is not intended to serve as a substitute for professional advice. Gardening conditions, plant health, and individual circumstances can vary widely, so results may differ from those described. Always consult a qualified horticulturist, local extension service, or other professional for personalized guidance tailored to your specific situation. The author and publisher are not responsible for any adverse effects or outcomes resulting from the application of the information provided in this content.
This content is for informational purposes only and not a substitute for professional advice.