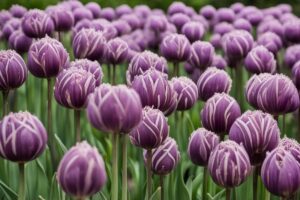
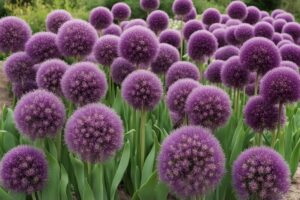
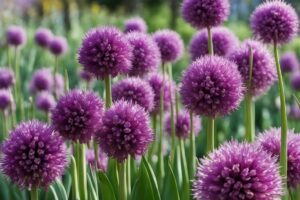
Whether you’re a seasoned gardener or just dipping your toes into the world of ornamental bulbs, alliums are a fantastic choice to elevate your garden’s aesthetic. With their striking spherical blooms and sturdy, statuesque stems, these plants—think onions, garlic, and chives on a grander scale—can transform any landscape into a visual masterpiece. But here’s the catch: how do you keep these beauties thriving year after year? That’s where proper care comes in, and I’m thrilled to share some hard-earned care tips for Allium bulbs that’ll help you avoid common pitfalls and enjoy those vibrant blooms for seasons to come. I’ve spent years tinkering with alliums in my own garden, learning through trial and error, and I’ve picked up insights from experts to ensure you’re not starting from scratch. Let’s dig in—pun intended!
Choosing the Right Spot for Your Allium Bulbs
First things first, location is everything when it comes to growing healthy alliums. These bulbs crave full sun—think at least six hours of direct light daily. I remember planting a batch of Allium ‘Purple Sensation’ in a partially shaded corner of my yard a few years back, hoping they’d adapt. Spoiler alert: they didn’t. The blooms were sparse, and the stems grew weak and leggy. Lesson learned! Find a spot that’s bathed in sunlight, and you’re already halfway to success.
Beyond sunlight, drainage is non-negotiable. Alliums despise “wet feet,” as soggy soil can lead to bulb rot faster than you can say “onion.” If your garden has heavy clay soil, consider amending it with compost or grit to improve drainage, or opt for raised beds. Test your soil by digging a small hole after rain—if water pools for more than a few hours, you’ve got a problem. A well-drained spot isn’t just a preference; it’s a lifeline for these bulbs.
Planting Allium Bulbs with Precision
Timing and technique are key when planting alliums, and getting this step right sets the tone for their growth. Fall is the ideal time—typically September to November—since it gives the bulbs a chance to establish roots before winter. I’ve found that planting too late, say in December, often results in stunted growth come spring. Aim for a soil temperature below 60°F (15°C) but before the ground freezes solid. If you’re unsure, a quick check with a soil thermometer can save you a headache.
As for depth, a good rule of thumb is to plant bulbs at a depth of about three times their height. For larger varieties like Allium giganteum, that might mean 6-8 inches deep. Space them 6-12 inches apart to allow for air circulation and prevent overcrowding. I once planted a cluster too close together, thinking it’d create a dramatic effect, but instead, they competed for nutrients and looked underwhelming. Give them room to shine! And don’t forget to point the tip upward—yes, I’ve made that rookie mistake too.
Watering and Feeding: Striking the Right Balance
Once your alliums are in the ground, watering can feel like a bit of a balancing act. They’re not needy plants, which is a blessing for busy gardeners like me, but they do require consistent moisture during their active growth in spring. Aim for about an inch of water per week, either from rainfall or manual watering, especially if you’re in a dry spell. However, don’t overdo it—soggy soil is their kryptonite. I’ve found that a simple finger test works wonders: stick your finger an inch into the soil near the bulbs. If it’s dry, water; if it’s damp, hold off.
Feeding is another area where less is often more. A balanced, slow-release fertilizer (like a 10-10-10 mix) applied in early spring as shoots emerge can give them a boost. Alternatively, work some well-rotted compost into the soil before planting. I’ve experimented with over-fertilizing in the past, thinking more nutrients equal bigger blooms, but it just led to excessive foliage at the expense of flowers. Trust me, moderation is your friend here.
Managing Pests and Diseases in Allium Bulbs
Here’s a bit of good news: alliums are pretty tough cookies when it comes to pests and diseases. Their onion-like scent naturally repels many critters, including deer and rodents—something I’ve appreciated living near a wooded area where deer are a constant threat to my tulips. That said, they’re not invincible. Keep an eye out for onion flies or leaf miners, which can occasionally target alliums. If you spot tiny tunnels in the leaves or wilting, a quick application of neem oil or insecticidal soap usually does the trick.
Fungal issues like botrytis or rust can creep in during wet, humid conditions. I’ve dealt with this firsthand after a particularly rainy spring—gray mold started forming on the lower leaves of my Allium sphaerocephalon. The fix? Improve air circulation by thinning out nearby plants and avoid overhead watering. If it’s too late, remove affected foliage and dispose of it (don’t compost it!). Prevention is always better than cure, so ensure good drainage from the get-go. Have you ever had to play plant detective in your garden? It’s a frustrating but necessary part of the journey.
Post-Bloom Care: Don’t Rush to Cut Back
After those gorgeous blooms fade, it’s tempting to tidy up by cutting everything back. Resist the urge! The foliage needs to die back naturally to funnel energy into the bulb for next year’s show. I made the mistake of snipping off yellowing leaves too early one season, and the following spring’s blooms were noticeably weaker. Let the leaves turn brown and wither on their own—it’s not pretty, but it’s worth it. If the look bothers you, plant companion perennials like daylilies nearby to mask the mess.
Once the foliage is fully dead, you can dig up the bulbs if you’re in a cold climate (zones 3-4) and store them in a cool, dry place over winter. Or, if you’re in a milder zone like I am (zone 6), leave them in the ground—they’re hardy enough to handle it. Just add a layer of mulch for extra protection. Imagine you’re tucking them in for a long winter nap; a little care now pays off later.
Dividing and Propagating for a Bigger Display
One of the joys of growing alliums is how they multiply over time, giving you more plants to spread around or share with friends. Every few years—say, three to five—dig up the clumps after the foliage dies back and gently separate the offset bulbs. Replant them immediately or store them for fall planting. I did this with a patch of Allium ‘Globemaster’ last year, and not only did I rejuvenate the original bed, but I also created a stunning new border along my driveway. It’s like getting free plants—who doesn’t love that?
Be patient, though. Newly divided bulbs might take a season or two to bloom as they rebuild their energy reserves. It’s a slow process, but gardening teaches you to play the long game. If you’re itching for quicker results, consider buying additional bulbs to mix in. Either way, dividing keeps your alliums from overcrowding and ensures those vibrant blooms keep coming.
References
- University of Minnesota Extension – Growing Alliums
- Missouri Botanical Garden – Allium Care Guide
- Penn State Extension – Ornamental Alliums
- Royal Horticultural Society – Allium Growing Guide
- Clemson University Cooperative Extension – Flowering Bulbs: Alliums
Disclaimer: This article is for informational purposes only, based on general research and personal gardening experience. It is not intended to serve as a substitute for professional advice. Gardening conditions, climates, and individual plant needs can vary widely, so results may differ based on your specific circumstances. Always consult a qualified horticulturist, local extension service, or other professional for personalized guidance tailored to your garden’s unique environment. I’m sharing what has worked for me and what’s supported by trusted sources, but I encourage you to experiment and adapt these tips as needed for your own green space.
This content is for informational purposes only and not a substitute for professional advice.