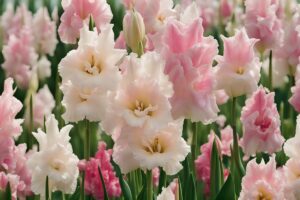
If you’ve ever dreamed of a garden bursting with vibrant, towering blooms that seem to pierce the sky, gladiolus bulbs might just be your ticket to paradise. These stunning flowers, often called “sword lilies” for their blade-like leaves, can transform any outdoor space into a colorful masterpiece. But here’s the catch: planting gladiolus bulbs isn’t as simple as tossing them into the dirt and hoping for the best. It takes a bit of know-how to get those spikes of color standing tall. That’s why I’m diving deep into the best gladiolus bulbs planting tips—to help you avoid common pitfalls and cultivate a display that’ll make your neighbors green with envy.
I’ve been gardening for over a decade, and gladiolus have always held a special place in my heart. I still remember the first time I planted them—half of my bulbs rotted because I didn’t account for drainage, and the other half barely bloomed due to poor timing. But through trial and error, along with advice from seasoned horticulturists, I’ve cracked the code. Let’s walk through everything you need to know to grow these beauties successfully, from picking the right spot to ensuring they thrive year after year.
Choosing the Perfect Location for Your Gladiolus Bulbs
Let’s start with the foundation of any good garden: location, location, location. Gladiolus bulbs crave sunlight like a kid craves candy—give them at least 6 to 8 hours of direct sun daily. If you plant them in a shady spot, you’ll end up with weak, spindly stems that flop over faster than a house of cards. I learned this the hard way when I tucked a batch behind a shady tree line, only to watch them stretch desperately for light.
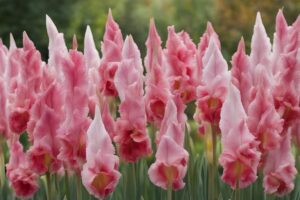
Besides sunlight, consider wind protection. Those tall flower spikes, which can reach up to 5 feet, are prone to snapping in strong gusts. If you’re in a windy area, plant them near a fence or hedge as a natural windbreak. And don’t forget about soil drainage—gladiolus hate “wet feet.” Imagine you’re dealing with a soggy backyard after a rainstorm; if water pools around your bulbs, they’ll rot before they even have a chance to sprout. Test your soil by digging a hole and filling it with water. If it doesn’t drain within an hour, mix in some sand or compost to improve things.
Timing Is Everything: When to Plant Gladiolus Bulbs
Timing can make or break your gladiolus game. These bulbs are typically planted in spring, after the last frost has passed, when soil temperatures are consistently above 55°F (13°C). Plant too early, and a surprise frost could zap your bulbs; plant too late, and they might not have enough time to establish before the heat of summer. In my zone 6 garden, I aim for mid-to-late April, but if you’re in a warmer climate like zone 9, you might get away with an earlier start.
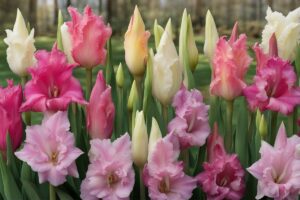
Here’s a pro tip: if you want a continuous bloom through summer and into fall, stagger your planting. Drop a few bulbs in the ground every two weeks over a month or so. That way, just as one batch finishes blooming, another is ready to steal the show. I tried this a few years back, and it felt like I had a floral conveyor belt—nonstop color for months!
Soil Prep and Planting Depth for Optimal Growth
Gladiolus bulbs aren’t picky eaters, but they do need a well-prepared bed to thrive. Aim for loamy, well-draining soil with a pH between 6.0 and 6.5. Before planting, I always work in a generous amount of organic matter like compost or aged manure—it’s like giving your bulbs a nutrient-packed breakfast to start their day. If your soil is heavy clay, lighten it up with some perlite or sand to prevent waterlogging.
When it comes to planting depth, here’s the golden rule: bury those bulbs about 4 to 6 inches deep, with the pointy end facing up. Too shallow, and they won’t anchor properly; too deep, and they’ll struggle to emerge. Space them about 6 inches apart to give each plant room to breathe. I like to use a bulb planter to keep things neat—it’s a small investment that saves your back and ensures consistent depth. Once they’re in, cover them with soil, give them a good drink of water, and let nature do its thing.
Watering and Feeding: Keeping Your Gladiolus Happy
Watering gladiolus bulbs is a bit of a balancing act. They need consistent moisture, especially during the growing season, but overwatering can lead to rot. Aim for about an inch of water per week, either from rainfall or manual watering. I’ve found that a soaker hose works wonders—it delivers water right to the roots without wasting any on the leaves, which can invite fungal issues.
As for feeding, gladiolus are heavy feeders. When the first shoots appear, hit them with a balanced fertilizer, like a 10-10-10 mix, to encourage strong growth. Then, switch to a high-potassium formula (think 5-10-15) when buds start forming to boost flower production. I made the mistake of skipping fertilizer one year, thinking my soil was “good enough,” and the blooms were disappointingly small. Lesson learned—don’t skimp on the nutrients!
Staking and Support: Preventing a Floral Flop
Ever seen a gladiolus spike topple over just as it’s about to bloom? It’s heartbreaking. These tall flowers often need a little help to stay upright, especially if you’re in a breezy spot. Staking is your best friend here. Drive a sturdy bamboo stake or metal rod into the ground near the base of the plant as soon as it starts growing, then loosely tie the stem to it with soft twine. I usually check my plants after every storm—last summer, a quick tie-up saved a whole row from snapping during a sudden squall.
If staking individual plants feels like too much hassle, consider planting in groups and using a grid of stakes with string to create a support system. It’s less work and looks natural. Just don’t wait until they’re leaning to act—by then, it might be too late to save the stem without damaging it.
Pest and Disease Management: Protecting Your Investment
Gladiolus bulbs aren’t immune to troublemakers. Thrips are a common pest, tiny critters that suck the life out of leaves and buds, leaving them scarred and stunted. If you spot silvery streaks on the foliage, act fast with an insecticidal soap or neem oil—I’ve had good luck with neem as a natural deterrent. Another issue is bulb rot, often caused by overly wet soil or poor storage. Always inspect your bulbs before planting; if they feel soft or mushy, toss them out to avoid spreading disease.
Fungal diseases like botrytis can also rear their ugly heads, especially in humid conditions. Keep air circulating by spacing plants properly, and avoid overhead watering. If you’ve battled these issues before, you know how frustrating it can be to lose half your crop. A preventative fungicide spray early in the season can be a lifesaver, but always follow label instructions to avoid harming beneficial insects.
Post-Bloom Care: Digging and Storing Bulbs for Next Year
Once the blooms fade, don’t just leave your gladiolus in the ground to fend for themselves—unless you’re in a very warm climate (zone 8 or higher), they won’t survive winter. After the foliage yellows, cut it back to about 2 inches above the ground, then carefully dig up the bulbs. I like to use a garden fork to avoid nicking them, as even a small cut can invite rot during storage.
Shake off excess soil, let the bulbs dry in a shady, well-ventilated spot for a couple of weeks, then store them in a cool, dry place (around 35-45°F) in a mesh bag or paper sack. I’ve lost bulbs to mold by storing them in plastic—don’t make that mistake! Check them monthly for signs of rot or pests, and come spring, you’ll have a fresh batch ready to plant. It’s like giving your garden a second chance at glory.
References
- University of Minnesota Extension – Growing Gladiolus
- Royal Horticultural Society – Gladiolus Growing Guide
- Old Farmer’s Almanac – Planting and Growing Gladiolus
Disclaimer: This article is for informational purposes only, based on general research and personal gardening experience. It is not intended to serve as a substitute for professional advice. Gardening conditions, soil types, and climate zones vary widely, and what works in one area may not apply to another. Always consult a qualified horticulturist, local extension service, or other professional for personalized guidance tailored to your specific situation. Additionally, when using fertilizers, pesticides, or other treatments, follow manufacturer instructions and safety guidelines to protect yourself, your plants, and the environment.
This content is for informational purposes only and not a substitute for professional advice.